![[HTML] 아이디 선택자 익히기 & menu 메뉴바 생성하기](https://img1.daumcdn.net/thumb/R750x0/?scode=mtistory2&fname=https%3A%2F%2Fblog.kakaocdn.net%2Fdna%2FbiOfru%2FbtroWnL0tN0%2FAAAAAAAAAAAAAAAAAAAAAEfCsmhdepG5AaIgtnXieYS5R6B-VseXbDq0lRMvvUss%2Fimg.png%3Fcredential%3DyqXZFxpELC7KVnFOS48ylbz2pIh7yKj8%26expires%3D1769871599%26allow_ip%3D%26allow_referer%3D%26signature%3DifLB0ONIS42q2ml5dXNQ1pgx%252F%252FQ%253D)
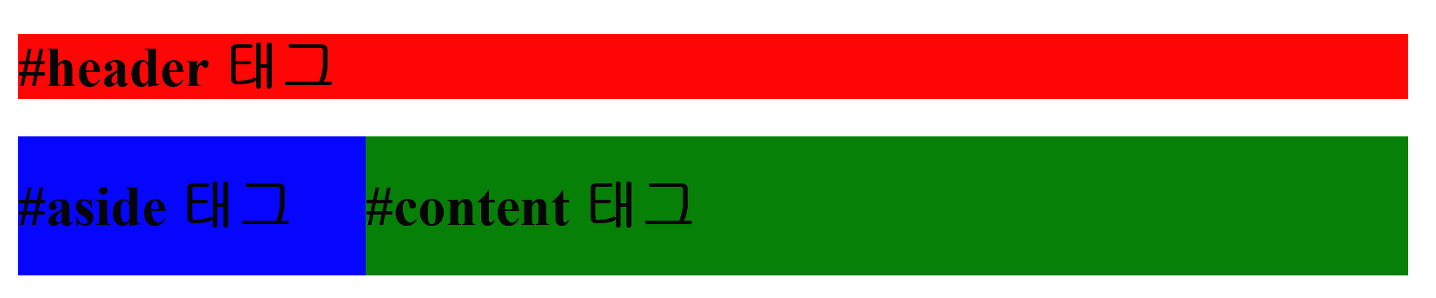
1. 아이디 선택자 익히기
- 공간 분할 태그에 id 선택자를 사용하여 id 속성을 적용하고 레이아웃을 구성한다.
- 아래의 이미지를 html로 구현한다.
<!DOCTYPE html>
<html>
<head>
    <title>CSS3 Selector Basic Page</title>
    <style>
        /* id 속성으로 header를 가지고 있는 태그의 스타일을 지정합니다. */
        #header {
            width: 800px; margin: 0 auto;
            background: red;
        }

        /* id 속성으로 wrap을 가지고 있는 태그의 스타일을 지정합니다. */
        #wrap {
            width: 800px; margin: 0 auto;
            overflow: hidden;
        }

        /* id 속성으로 aside를 가지고 있는 태그의 스타일을 지정합니다. */
        #aside {
            width: 200px; float: left;
            background: blue;
        }

        /* id 속성으로 content를 가지고 있는 태그의 스타일을 지정합니다. */
        #content {
            width: 600px; float: left;
            background: green;
        }
    </style>
</head>
<body>
    <div id="header">
        <h1>Header</h1>
    </div>
    <div id="wrap">
        <div id="aside">
            <h1>Aside</h1>
        </div>
        <div id="content">
            <h1>Content</h1>
        </div>
    </div>
</body>
</html>
2. ul 구현 - menu1
- 아래의 이미지를 ul로 구현한다.

<!DOCTYPE html>
<html>
<head>
<style>
ul {
list-style-type: none;
margin: 0;
padding: 0;
}
li {
display: inline;
}
</style>
</head>
<body>
<ul>
<li><a href="#home">Home</a></li>
<li><a href="#news">News</a></li>
<li><a href="#contact">Contact</a></li>
<li><a href="#about">About</a></li>
</ul>
</body>
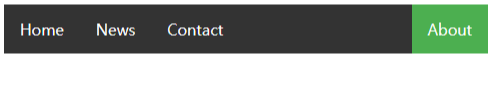
</html>3. ul 구현 - menu2
- 아래의 이미지를 ul로 구현한다.

<!DOCTYPE html>
<html>
<head>
<style>
ul {
  list-style-type: none;
  margin: 0;
  padding: 0;
  overflow: hidden;
}

li {
  float: left;
}

li a {
  display: block;
  padding: 8px;
  background-color: #dddddd;
}
</style>
</head>
<body>

<ul>
  <li><a href="#home">Home</a></li>
  <li><a href="#news">News</a></li>
  <li><a href="#contact">Contact</a></li>
  <li><a href="#about">About</a></li>
</ul>

<p><b>Note:</b> If a !DOCTYPE is not specified, floating items can produce unexpected results.</p>
<p>A background color is added to the links to show the link area. The whole link area is clickable, not just the text.</p>
<p><b>Note:</b> overflow:hidden is added to the ul element to prevent li elements from going outside of the list.</p>

</body>
</html>
4. ul 구현 - menu3
- a 태그 링크의 밑줄을 없앤다.

<!DOCTYPE html>
<html>
<head>
<style>
ul {
  list-style-type: none;
  margin: 0;
  padding: 0;
  overflow: hidden;
  background-color: #dddddd;
}

li {
  float: left;
}

li a {
  display: block;
  padding: 8px;
}
</style>
</head>
<body>

<ul>
  <li><a href="#home">Home</a></li>
  <li><a href="#news">News</a></li>
  <li><a href="#contact">Contact</a></li>
  <li><a href="#about">About</a></li>
</ul>

<p>A background color is added to the list instead of each link to create a full-width background color.</p>
<p><b>Note:</b> overflow:hidden is added to the ul element to prevent li elements from going outside of the list.</p>

</body>
</html>
5. ul 구현 - menu4
- 마우스를 올리면 메뉴 색상이 변경되도록 한다.

<!DOCTYPE html>
<html>
<head>
<style>
ul {
  list-style-type: none;
  margin: 0;
  padding: 0;
  overflow: hidden;
  background-color: #333;
}

li {
  float: left;
}

li a {
  display: block;
  color: white;
  text-align: center;
  padding: 14px 16px;
  text-decoration: none;
}

li a:hover {
  background-color: #111;
}
</style>
</head>
<body>

<ul>
  <li><a class="active" href="#home">Home</a></li>
  <li><a href="#news">News</a></li>
  <li><a href="#contact">Contact</a></li>
  <li><a href="#about">About</a></li>
</ul>

</body>
</html>
6. ul 구현 - menu5
- 아래 이미지를 html로 구현한다.

<!DOCTYPE html>
<html>
<head>
<style>
ul {
  list-style-type: none;
  margin: 0;
  padding: 0;
  overflow: hidden;
  background-color: #333;
}

li {
  float: left;
}

li a {
  display: block;
  color: white;
  text-align: center;
  padding: 14px 16px;
  text-decoration: none;
}

li a:hover:not(.active) {
  background-color: #111;
}

.active {
  background-color: #4CAF50;
}
</style>
</head>
<body>

<ul>
  <li><a class="active" href="#home">Home</a></li>
  <li><a href="#news">News</a></li>
  <li><a href="#contact">Contact</a></li>
  <li><a href="#about">About</a></li>
</ul>

</body>
</html>
7. ul 구현 - menu6
- 아래 이미지를 html로 구현한다.
<!DOCTYPE html>
<html>
<head>
<style>
ul {
  list-style-type: none;
  margin: 0;
  padding: 0;
  overflow: hidden;
  background-color: #333;
}

li {
  float: left;
}

li a {
  display: block;
  color: white;
  text-align: center;
  padding: 14px 16px;
  text-decoration: none;
}

li a:hover:not(.active) {
  background-color: #111;
}

.active {
  background-color: #4CAF50;
}
</style>
</head>
<body>

<ul>
  <li><a href="#home">Home</a></li>
  <li><a href="#news">News</a></li>
  <li><a href="#contact">Contact</a></li>
  <li style="float:right"><a class="active" href="#about">About</a></li>
</ul>

</body>
</html>
8. ul 구현 - menu7
- 아래 이미지를 html로 구현한다.

<!DOCTYPE html>
<html>
<head>
<style>
ul {
list-style-type: none;
margin: 0;
padding: 0;
overflow: hidden;
background-color: #333;
}
li {
float: left;
border-right:1px solid #bbb;
}
li:last-child {
border-right: none;
}
li a {
display: block;
color: white;
text-align: center;
padding: 14px 16px;
text-decoration: none;
}
li a:hover:not(.active) {
background-color: #111;
}
.active {
background-color: #4CAF50;
}
</style>
</head>
<body>
<ul>
<li><a class="active" href="#home">Home</a></li>
<li><a href="#news">News</a></li>
<li><a href="#contact">Contact</a></li>
<li style="float:right"><a href="#about">About</a></li>
</ul>
</body>
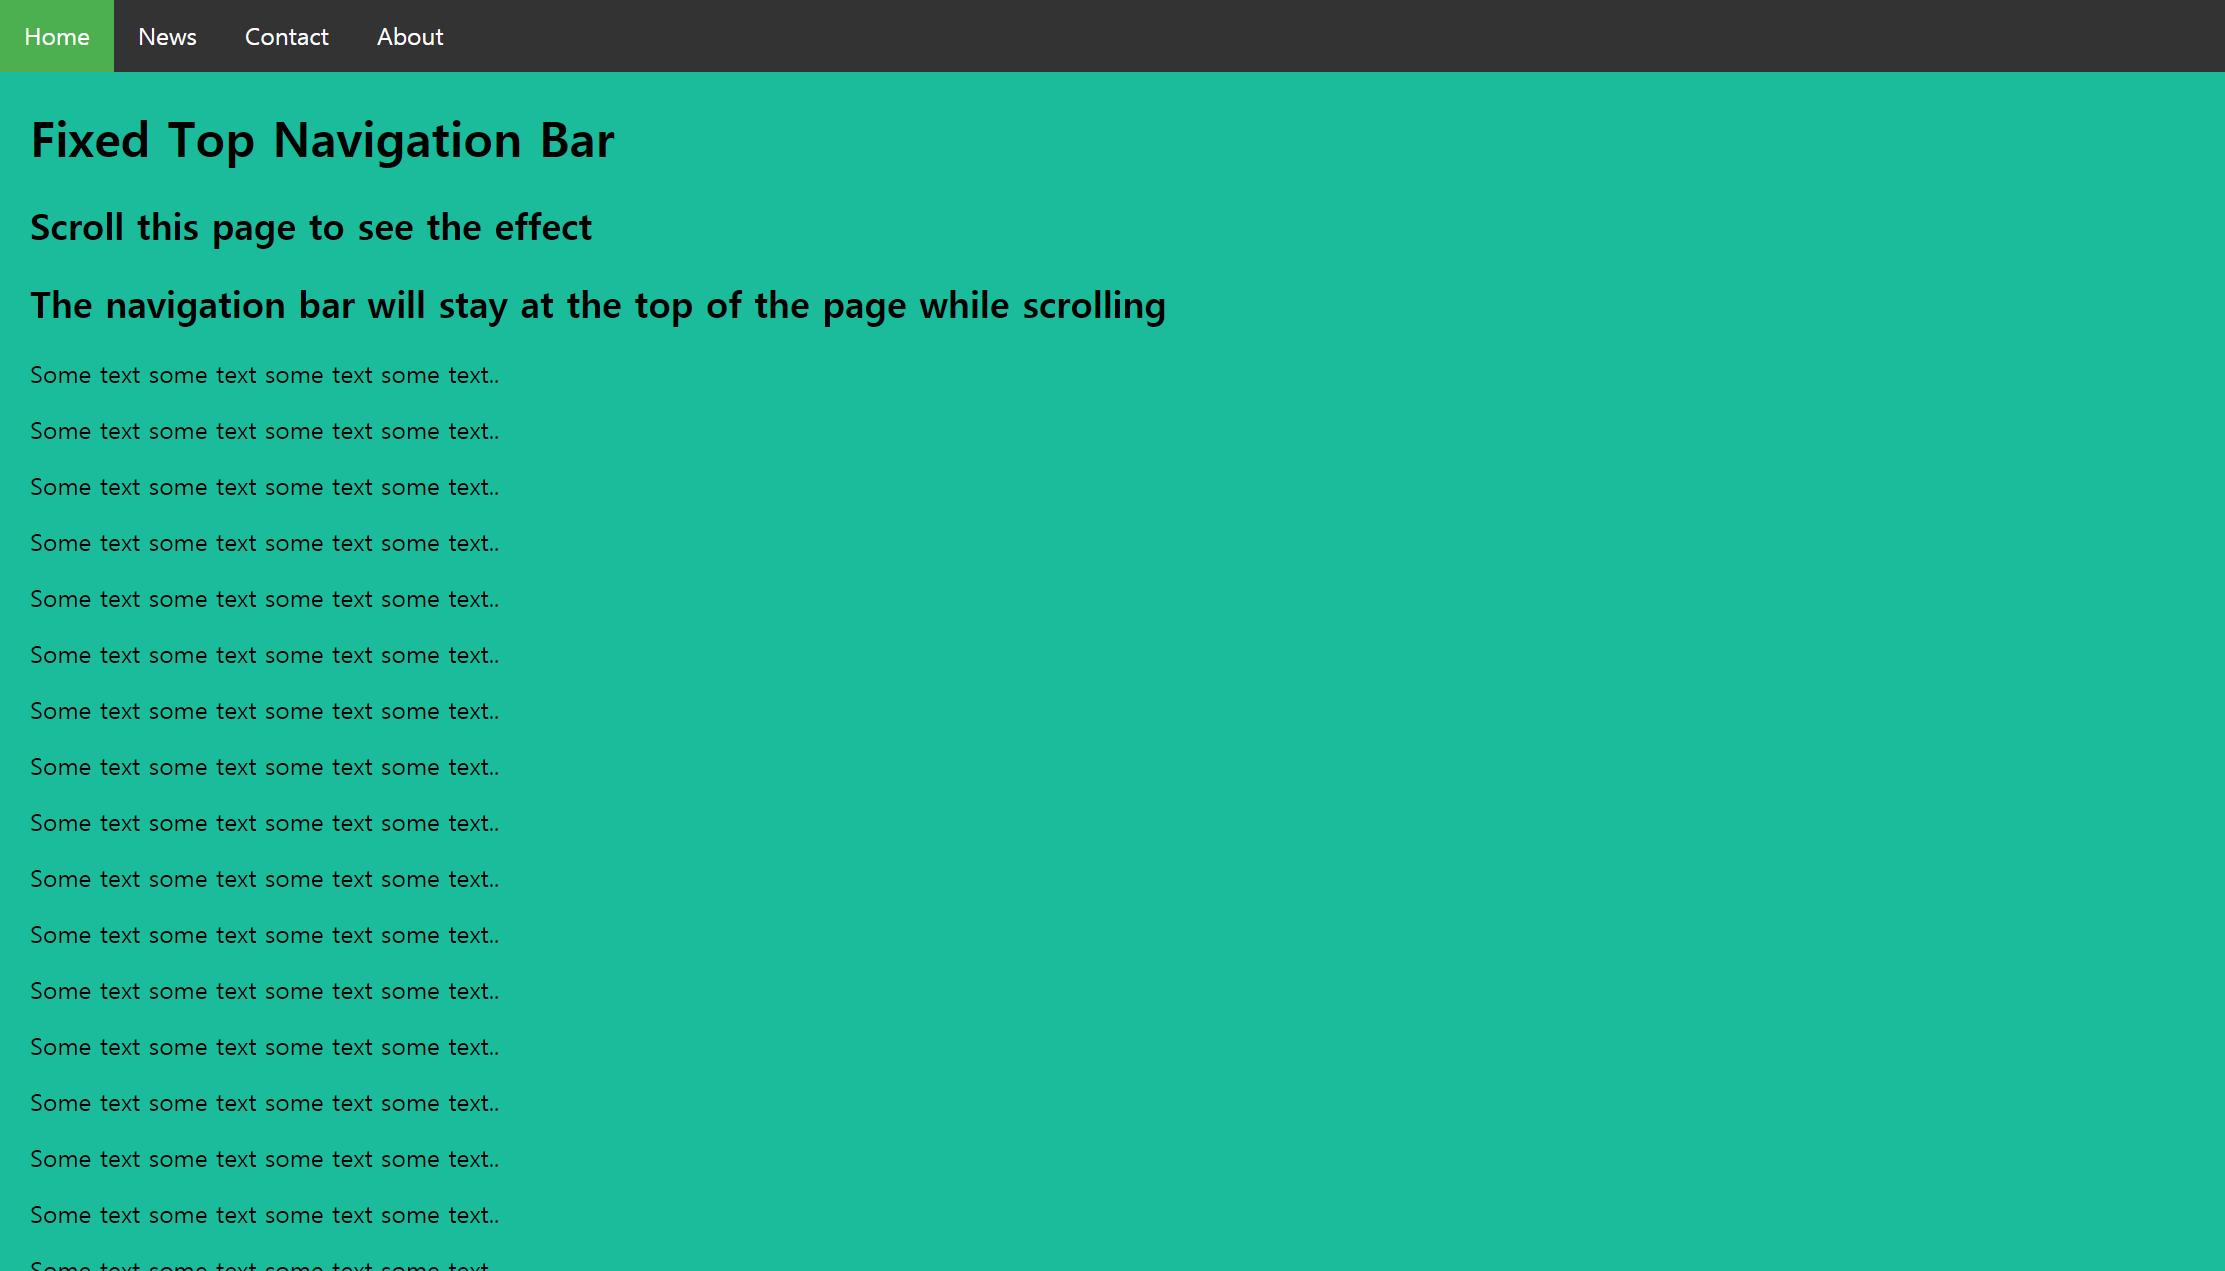
</html>9. 상단 고정 메뉴 & 하단 고정 메뉴
- 아래 이미지를 html로 구현한다.
(1) 상단 고정 메뉴
<!DOCTYPE html>
<html>
<head>
<style>
body {margin:0;}

ul {
  list-style-type: none;
  margin: 0;
  padding: 0;
  overflow: hidden;
  background-color: #333;
  position: fixed;
  top: 0;
  width: 100%;
}

li {
  float: left;
}

li a {
  display: block;
  color: white;
  text-align: center;
  padding: 14px 16px;
  text-decoration: none;
}

li a:hover:not(.active) {
  background-color: #111;
}

.active {
  background-color: #4CAF50;
}
</style>
</head>
<body>

<ul>
  <li><a class="active" href="#home">Home</a></li>
  <li><a href="#news">News</a></li>
  <li><a href="#contact">Contact</a></li>
  <li><a href="#about">About</a></li>
</ul>

<div style="padding:20px;margin-top:30px;background-color:#1abc9c;height:1500px;">
  <h1>Fixed Top Navigation Bar</h1>
  <h2>Scroll this page to see the effect</h2>
  <h2>The navigation bar will stay at the top of the page while scrolling</h2>

  <p>Some text some text some text some text..</p>
  <p>Some text some text some text some text..</p>
  <p>Some text some text some text some text..</p>
  <p>Some text some text some text some text..</p>
  <p>Some text some text some text some text..</p>
  <p>Some text some text some text some text..</p>
  <p>Some text some text some text some text..</p>
  <p>Some text some text some text some text..</p>
  <p>Some text some text some text some text..</p>
  <p>Some text some text some text some text..</p>
  <p>Some text some text some text some text..</p>
  <p>Some text some text some text some text..</p>
  <p>Some text some text some text some text..</p>
  <p>Some text some text some text some text..</p>
  <p>Some text some text some text some text..</p>
  <p>Some text some text some text some text..</p>
  <p>Some text some text some text some text..</p>
  <p>Some text some text some text some text..</p>
  <p>Some text some text some text some text..</p>
  <p>Some text some text some text some text..</p>
</div>

</body>
</html>
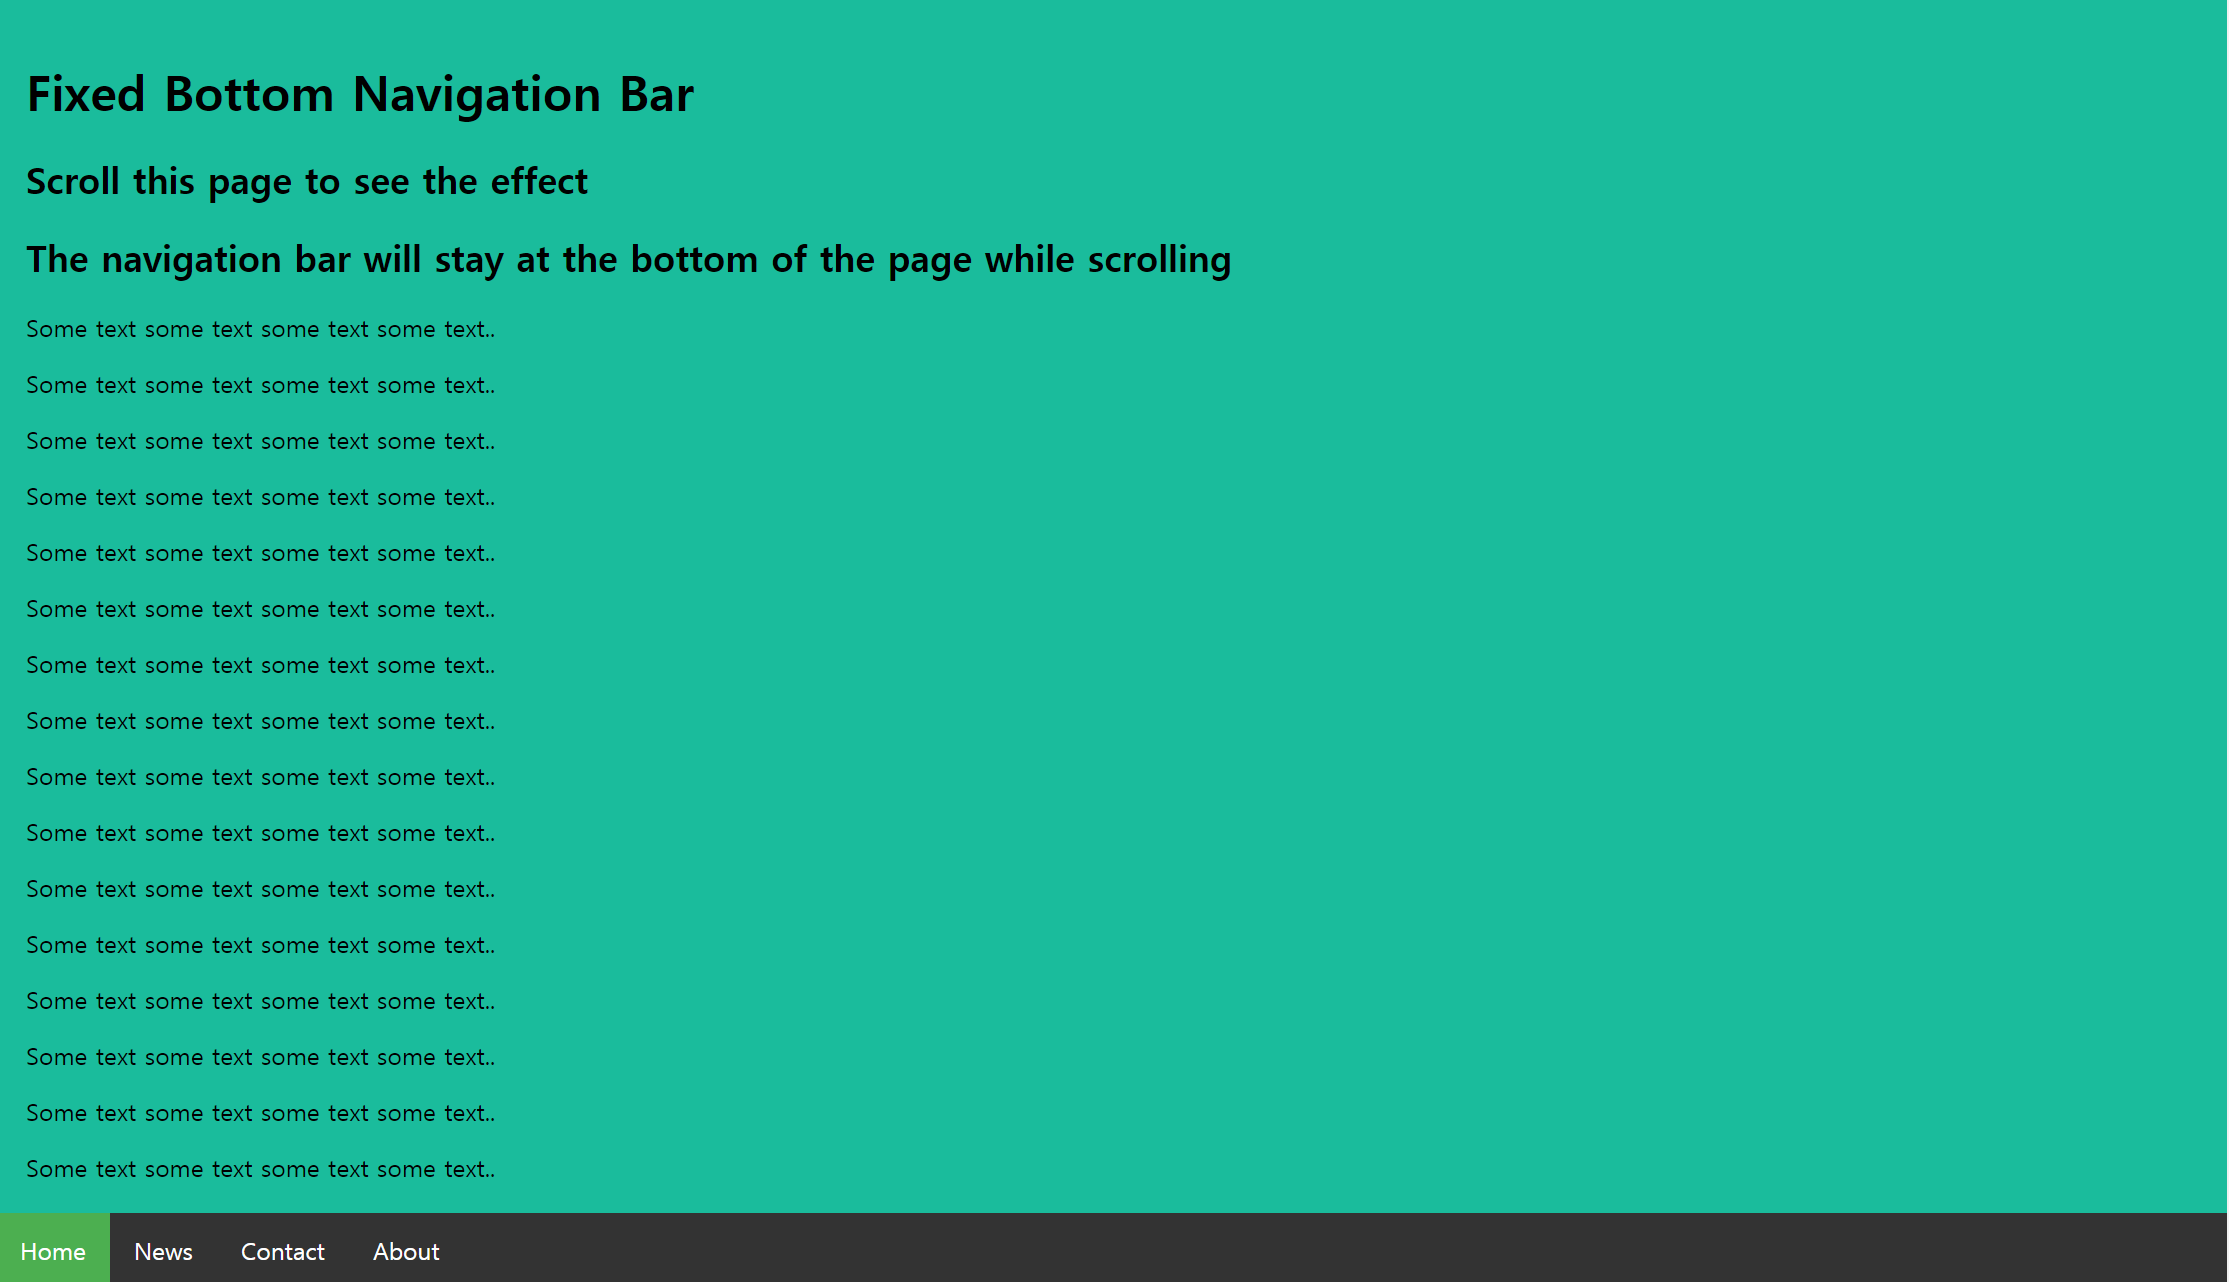
(2) 하단 고정 메뉴
<!DOCTYPE html>
<html>
<head>
<style>
body {margin:0;}

ul {
  list-style-type: none;
  margin: 0;
  padding: 0;
  overflow: hidden;
  background-color: #333;
  position: fixed;
  bottom: 0;
  width: 100%;
}

li {
  float: left;
}

li a {
  display: block;
  color: white;
  text-align: center;
  padding: 14px 16px;
  text-decoration: none;
}

li a:hover:not(.active) {
  background-color: #111;
}

.active {
  background-color: #4CAF50;
}
</style>
</head>
<body>

<ul>
  <li><a class="active" href="#home">Home</a></li>
  <li><a href="#news">News</a></li>
  <li><a href="#contact">Contact</a></li>
  <li><a href="#about">About</a></li>
</ul>

<div style="padding:20px;background-color:#1abc9c;height:1500px;">
  <h1>Fixed Bottom Navigation Bar</h1>
  <h2>Scroll this page to see the effect</h2>
  <h2>The navigation bar will stay at the bottom of the page while scrolling</h2>

  <p>Some text some text some text some text..</p>
  <p>Some text some text some text some text..</p>
  <p>Some text some text some text some text..</p>
  <p>Some text some text some text some text..</p>
  <p>Some text some text some text some text..</p>
  <p>Some text some text some text some text..</p>
  <p>Some text some text some text some text..</p>
  <p>Some text some text some text some text..</p>
  <p>Some text some text some text some text..</p>
  <p>Some text some text some text some text..</p>
  <p>Some text some text some text some text..</p>
  <p>Some text some text some text some text..</p>
  <p>Some text some text some text some text..</p>
  <p>Some text some text some text some text..</p>
  <p>Some text some text some text some text..</p>
  <p>Some text some text some text some text..</p>
  <p>Some text some text some text some text..</p>
  <p>Some text some text some text some text..</p>
  <p>Some text some text some text some text..</p>
  <p>Some text some text some text some text..</p>
</div>

</body>
</html>'HTML > Day38' 카테고리의 다른 글
| [CSS] CSS 예제 (0) | 2021.12.28 |
|---|